
When I was at Shmoocon, I saw a talk about how to write an effective capture-the-flag contest. One of their suggestions was to have a tar-pit challenge that would waste all the time of the best player, by giving him a complicated challenge he won’t be able to resist. In my opinion, in PlaidCTF, I suspected that “cnot” was that challenge. And I was the sucker, even though I knew it all the way…
(It turns out, after reviewing writeups of other challenges, that most of the challenges were like this; even so, I’m proud to have been sucked in!)
If you want a writeup where you can learn something, I plan to post a writeup for “Ropasaurus” in the next day or two. If you want a writeup about me being tortured as I fought through inconceivable horrors to finish a level and capture the bloody flag, read on! This level wasn’t a lot of learning, just brute-force persistence. It’s worthwhile to note that I’m not going to cover every piece or every line—maybe I’ll do that as a novel in the future—this is mostly going to be a summary. Even so, this is going to be a long writeup. I’m trying to make it interesting and fun to read, and to break it into shorter sections. But heed this warning!
Also, I may switch between “I” and “we” throughout the writeup. This indicates when I was being helped by somebody, when I was alone, and when I was simply going insane. I’m pretty sure the voices in my head helping with a solution are a good enough reason to say “we” instead of “I”, right?
Now that the contest is over, the source has been released. Here’s the command they used for compiling it, directly from that source:
1 // compile with:
2 // isildur cnot.c0 -l l4rt.h0 -o test.s --obfuscate --anti-debug --confuse
3 // gcc test.s obf.c -o cnot
4 // strip cnot
–obfuscate, –anti-debug, and –confuse? Awww, you shouldn’t have! But, I digress. I didn’t have this info back then…
Being that I fancy myself a reverse engineer, this level appealed to me right away. In fact, it’s the first one I looked at, despite it being the highest point value. Go big or go home!
I spent about fifteen minutes poking around. I determined that the binary was ugly as sin, that the debugger didn’t work, and that it was 64-bit Intel assembly. Well fuck, I don’t even know x64 (well, I didn’t when I started this CTF, at least). So I gave up and moved onto another level, Ropasaurus (which will have its own writeup).
After solving a some other levels with the help of HikingPete (Ropasaurus, Cyrpto, and charsheet), I came back to cnot late Friday night. Mak and Nate had put several hours into it and had given up. It was all up to me.
Let’s start by summarizing the weekend…
Work on it till 6am. Wake up at 9am. Work on another problem for a couple hours, return to cnot by noon. Work solid—besides a meal—till 6am again. Getting so close, but totally stuck.
Wake up early again, go straight to it. 9am I think? Stuck, so stuck. Came up with ideas, failed, more ideas, failed failed failed. Finally, thought of something. Can it work…? IT DID! FLAG OBTAINED!! Hardest binary I’ve ever reversed, and I was suddenly an expert on x64! Done by 2pm, too! That means I only spent.. thirty hours? Is that right? Dear lord…
And you know what the kicker is? Even without the obfuscation, without the anti-debugging, and without the… confusion? This still would have been a goddamn hard binary! Hell, take a look at the C version. Even that would have been a huge pain!
But now I’m definitely getting ahead of myself. The rest of this document will be about what worked, I don’t explore too many of the ‘wrong paths’ I took, except where it’s pedagogical to do so.
The setup
Basically, we had a 64-bit Linux executable file, and no hints of any kind. I fired up a Debian 6.0.7 machine with basically default everything, except that I installed my favourite dev/reversing tools that you’ll see throughout this writeup. I also had a Windows machine with a modern version of IDA Pro. If you plan to do any reversing, you need IDA Pro. The free version works for most stuff, but modern versions are way faster and handle a lot more madness.
You run the program, it simply asks for a password. You type in something, and it generally says “Wrong!” and ends:
1 ron@debian-x86 ~/cnot $ ./cnot
2 Please enter your password: hello
3 Wrong!
The goal was to figure out the password for this executable, which was the flag.
And that’s our starting point. So far so good!
At this point, I had a lot of ideas. Sometimes, you start with the error message, work your way back to a comparison, and look at what’s being compared to what. Sometimes, you start with the input and look at how it’s being mangled. Or sometimes, you quietly sob in the corner. I tried the first two approaches at the start, and then steadily moved on to the last.
Wasted effort
Mak and Nate had started working on the project without me, and Mak had started writing a timing-attack tool. Sometimes, if one letter is compared at a time, you can derive each letter individually by timing the comparisons and looking at which one is the fastest. That could save a ton of reversing time!
If I’d known then what I know now, I wouldn’t have bothered. This had no hope of working. But it was worth a shot!
I helped Mak finish a program that would:
- Choose a letter
- Write it to a file
- Start a high resolution timer (using rdtsc, which counts the number of cycles since reset)
- Run the process
- Read the timer state
- Repeat for each letter, choose the best
- Go back to the top and choose another letter
This works exceptionally well, in some cases. This was not one of the cases. It turns out that the letters were validated with a checksum first, which instantly breaks it. Then they were validated out of order, and in various other ways, all of which would break this. So, long story short, it was a waste of our time.
Luckily, after an hour or two, I said “this isn’t working” and we moved on without ever looking back.
Anti-debugging
Our first step was anti-debugging, because this:
1 $ gdb ./cnot
2 Reading symbols from /home/ron/cnot/cnot...(no debugging symbols found)...done.
3 (gdb) run hello
4 Starting program: /home/ron/cnot/cnot hello
5
6 Program received signal SIGSEGV, Segmentation fault.
7 0x00400b86 in ?? ()
8
You assholes! If you run it with strace, you’ll see this:
1 trace ./cnot 2>&1 | tail -n4
2   munmap(0x7f5cc9159000, 63692)           = 0
3   ptrace(PTRACE_TRACEME, 0, 0, 0)         = -1 EPERM (Operation not permitted)
4   --- SIGSEGV (Segmentation fault) @ 0 (0) ---
5   +++ killed by SIGSEGV (core dumped) +++
6
So it’s calling ptrace right before dying, eh? Well, I know how to deal with that! Mak wrote a quick library:
1   ron@debian-x64 ~/cnot $ echo 'long ptrace(int a, int b, int c){return 0;}' > override.c
2   ron@debian-x64 ~/cnot $ gcc -shared -fPIC -o override.so ./override.c
Add it to our gdbinit file:
1 $ cat gdbinit
2 # Set up the environment
3 set disassembly-flavor intel
4 set confirm off
5
6 # Disable the anti-debugging
7 set environment LD_PRELOAD ./overload.so
And run the program with that gdbinit file:
1 $ gdb -x ./gdbinit ./cnot
2 Reading symbols from /home/ron/cnot/cnot...(no debugging symbols found)...done.
3 (gdb) run
4 Please enter your password: hello
5 Wrong!
6
7 Program exited normally.
8
Thankfully, that was the only anti-debugging measure taken. gdbinit files are actually something I learned from Mak while working on the IO Wargame, and are one of the most valuable tools in your debugging arsenal!
First steps
First of all, let’s take a look at the imports; this can be done more easily in IDA, but to avoid filling this writeup with screenshots, I’ll use objdump to get the equivalent information:
 1 ron@debian-x86 ~/cnot $ objdump -R cnot
 2
 3 cnot:     file format elf64-x86-64
 4
 5 DYNAMIC RELOCATION RECORDS
 6 OFFSET           TYPE              VALUE
 7 006101b8 R_X86_64_GLOB_DAT   __gmon_start__
 8 00610240 R_X86_64_COPY       stdin
 9 00610250 R_X86_64_COPY       stdout
10 006101d8 R_X86_64_JUMP_SLOT  __isoc99_fscanf
11 006101e0 R_X86_64_JUMP_SLOT  exit
12 006101e8 R_X86_64_JUMP_SLOT  __libc_start_main
13 006101f0 R_X86_64_JUMP_SLOT  ungetc
14 006101f8 R_X86_64_JUMP_SLOT  fputc
15 00610200 R_X86_64_JUMP_SLOT  fgetc
16 00610208 R_X86_64_JUMP_SLOT  ptrace
17 00610210 R_X86_64_JUMP_SLOT  raise
18 00610218 R_X86_64_JUMP_SLOT  calloc
19 00610220 R_X86_64_JUMP_SLOT  feof
20 00610228 R_X86_64_JUMP_SLOT  fprintf
fputc() and fgetc() were the ones I was most interested in. To make a long story short, we put a breakpoint on fputc() to see when it was called. It was called twice for each character. Once—at offset 0x40F63B—it was in a function that checked for EOF (end of file) then used ungetc() to put it back. It was never actually returned. The other time—at offset 0x40F723—it was called then the function returned the character. That’s where I focused.
I used a breakpoint to confirm that it was actually calling each of those functions for every character I entered. It was.
At that point, I tried to follow the logic onward from where the value was read. Me and Mak, together, followed the path that was then taken through the code. Essentially, checks were done for EOF, for NULL being returned from fgetc(), and for a newline. If it was any of those, it would jump to a label that I called found_newline or something like that. We pushed our way through the obfuscated code, though, which IDA did a poor job of figuring out.
Eventually, we managed to get back to the fgetc() calls through the biiiig loop. When I tried to follow the other code path, to see how the program handles the completed string, I quickly became lost.
I then tried the other approach—starting from the “Wrong!” label and working backwards. I found all the calls to fputc() in gdb by doing the following:
Run the program until it requests password (recalling that “-x ./gdbinit” loads my init script, which loads override.so to fix the anti-debugging), then break by using ctrl-c:
 1 $ gdb -x ./gdbinit ./cnot
 2 Reading symbols from /home/ron/cnot/cnot...(no debugging symbols found)...done.
 3 (gdb) run
 4 Please enter your password: ^C
 5 Program received signal SIGINT, Interrupt.
 6 0x00007ffff793f870 in read () from /lib/libc.so.6
 7
Add a breakpoint at fputc(), then continue and enter “hello” for my password:
 8
 9 (gdb) b fputc
10 Breakpoint 1 at 0x7ffff78e26d0
11 (gdb) cont
12 hello
13
Once it breaks, run the “finish” command twice to exit two layers of function:
14
15 Breakpoint 1, 0x00007ffff78e26d0 in fputc () from /lib/libc.so.6
16 (gdb) finish
17 0x0040f6c6 in ?? ()
18 (gdb) finish
19 0x00400840 in ?? ()
Now we’re at 0x400840. If you look at the function it’s in, you’ll see that it ends like this:
1 .text:00400851     pop     rdi
2 .text:00400852     jmp     rdi
As a result, gdb won’t be able to “finish” properly since it never (technically) returns! Instead, we set a breakpoint on the last line then use the “stepi” command to step out:
1 (gdb) break *0x400852
2 Breakpoint 2 at 0x400852
3 (gdb) cont
4
5 Breakpoint 2, 0x00400852 in ?? ()
6 (gdb) stepi
7 0x0040f149 in ?? ()
0x40f149! If you’re following along in IDA, you’ll see a ton of undefined code there. D’oh! You can use ‘c’ to define the code in IDA, just keep moving up and down and pressing ‘c’ (and occasionally ‘u’ when you see SSE instructions) in various places till stuff looks right. Eventually, you’ll see:
 1 .text:0040F10F     mov     qword ptr [rbp-68h], 0
 2 .text:0040F117     mov     dword ptr [rbp-68h], 'W'
 3 .text:0040F11E     push    r8
 4 .text:0040F120     push    r9
 5 .text:0040F122     push    rcx
 6 .text:0040F123     xor     rcx, rcx
 7 .text:0040F126     jz      short near ptr loc_40F128+1
 8 .text:0040F128
 9 .text:0040F128 loc_40F128:
10 .text:0040F128     mulps   xmm2, xmmword ptr [rcx+53h]
11 .text:0040F12C     push    rdx
12 .text:0040F12D     call    $+5
13 .text:0040F132     pop     rdx
14 .text:0040F133     add     rdx, 8
15 .text:0040F137     push    rdx
16 .text:0040F138     retn
17 .text:0040F138                ; -------------
18 .text:0040F139    db  0Fh
19 .text:0040F13A                ; -------------
20 .text:0040F13A     pop     rdx
21 .text:0040F13B     pop     rbx
22 .text:0040F13C     pop     rcx
23 .text:0040F13D     mov     rdi, [rbp-68h]
24 .text:0040F141     mov     r15, rax
25 .text:0040F144     call    sub_400824
This isn’t quite right, because of the jz and the call/push/ret in the middle, but we’ll deal with that shortly. For now, look at 0x0040F117—push ‘W’—and 0x40F144—call the function that calls fputc()! If you follow it down, you’ll find the ‘r’, ‘o’, ‘n’, ‘g’, ‘!’, newline, and then ‘C’, ‘o’, ‘r’, ‘r’, ‘e’, ‘c’, ‘t’, ‘!’. That’s great news! We found where it prints the two cases!
The problem is, it’s ugly as sin. I can’t even count the number of times I used ‘u’ to undefine bad instructions and ‘c’ to define better ones before I finally gave up and edited the binary…
Anti-reversing
The best thing I ever did—and I wish I did it earlier!—was to fix the anti-reversing nonsense. There are long strings of the same thing that make analysis hard. In the previous example, everything from the push at 0x40F122 to the mov at 0x40F13D is totally worthless, and just confuses the disassembler, so let’s get rid of it!
I loaded up the file in xvi32.exe—my favourite Windows hex editor—and did a find/replace on the sequence of bytes:
51 48 31 C9 74 01 0F 59 51 53 52 E8 00 00 00 00 5A 48 83 C2 08 52 C3 0F 5A 5B 59
with NOPs:
90 90 90 90 90 90 90 90 90 90 90 90 90 90 90 90 90 90 90 90 90 90 90 90 90 90 90
936 occurrences replaced! Awesome! But there was still some obfuscation left that looked like this:
1 .text:0040F123      xor     rcx, rcx
2 .text:0040F126      jz      short near ptr loc_40F128+1
3 .text:0040F128
4 .text:0040F128 loc_40F128:
5 .text:0040F128      mulps   xmm2, xmmword ptr [rcx+53h]
6 .text:0040F12C      push    rdx
Note the jz—it actually jumps one byte, which means the instruction immediately following—the mulps—is an invalid instruction. The 0x0f is unused! This one is simple to fix—just replace 74 01 FF—the jump and the fake instruction—with NOPs:
74 01 0F => 90 90 90
This fixes 290 more occurrences of code that confuses IDA!
And then there’s this:
1 .text:00400C44     call    $+5
2 .text:00400C49     pop     rdx
3 .text:00400C4A     add     rdx, 8
4 .text:00400C4E     push    rdx
5 .text:00400C4F     retn
6 .text:00400C4F sub_400BD1      endp ; sp-analysis failed
7 .text:00400C4F
8 .text:00400C50     cvtps2pd xmm3, qword ptr [rbx+59h]
Which can be removed with this pattern:
e8 00 00 00 00 5a 48 83 c2 08 52 c3 0f
74 of which were removed.
After all that, I loaded the executable back in IDA, and it was much nicer! I realized later that there was probably more code I could have removed—such as the pop edi / jmp edi that’s used instead of returning—but I got too invested in my IDA database that I didn’t want to mess it up.
Tracking down the compare
All righty, now that we’ve cleaned up the code, we’re starting to make some progress! By the time I got here, it was about 2am on Friday night, and I was still going strong (despite Mak being asleep behind me on a table). [Editor’s Note: I needed my beauty sleep, dammit!]
Let’s start by finding the ‘Wrong’ and ‘Correct’ strings again. You can breakpoint on fputc(), or you can just go to the definition of fputc() and keep jumping to cross references. Whatever you do, I want you to eventually wind up at the line that pushes the ‘W’ from ‘Wrong!’, which is here:
1 .text:0040F117 mov dword ptr [rbp-68h], 'W'
Two lines above it, you’ll see a conditional jump:
1 .text:0040F109 jz loc_40F359
If you follow that jump, you’ll see that if it jumps, it prints out ‘Correct’; otherwise, it prints ‘Wrong’. We can confirm this by forcing the jump, but first let’s update our gdbinit file to break at the ‘start’ function:
 1 ron@debian-x64 ~/cnot $ cat gdbinit
 2 # Set up the environment
 3 set disassembly-flavor intel
 4 set confirm off
 5
 6 # Disable the anti-debugging
 7 set environment LD_PRELOAD ./overload.so
 8
 9 # Put a breakpoint at the 'start' function
10 break *0x00400710
11
12 # Run the program up to the breakpoint
13 run
Now we run the program, and change the jz at line 0x0040f109 to a jmp:
 1 $ gdb -x ./gdbinit ./cnot
 2 Reading symbols from /home/ron/cnot/cnot...(no debugging symbols found)...done.
 3 Breakpoint 1 at 0x400710
 4
 5 Breakpoint 1, 0x00400710 in ?? ()
 6 (gdb) set {char}0x0040f109 = 0x90
 7 (gdb) set {char}0x0040f10a = 0xE9
 8 (gdb) x/2i 0x0040f109
 9 0x40f109:       nop
10 0x40f10a:       jmp    0x40f359
11 (gdb) cont
12 Please enter your password: hello
13 Correct!
So, we change 0x401109 to 0x90 (nop) and 0x0040f10a to 0xe9 (jmp long), verify the instructions, and run the program. Sure enough, my password now produces ‘hello’. Success! Now I just have to backstep a little bit and find the comparison, and we’re done! Simple! Haha!
13 steps to success
So, every variable is set in an ass-backwards way. You get pretty accustomed to seeing it in this level, and kind of just mentally pattern-match it. I’m sure there’s a better way, but eh? I got pretty fast at it as time went on.
The decision whether or not to make the important jump comes from [rbp-78h], which comes from [rbp-58h] (via like ten other variables). The only way to get that variable set properly is right here:
1 .text:0040F08E                mov     qword ptr [rbp-58h], 0
2 .text:0040F096                mov     dword ptr [rbp-58h], 1
Right below that, I noticed this code:
 1 .text:0040F09D     jmp     short $+2
 2 .text:0040F09F
 3 .text:0040F09F loc_40F09F:      ; CODE XREF: sub_40911F+5F6Dj
 4 .text:0040F09F     jmp     short $+2
 5 .text:0040F0A1
 6 .text:0040F0A1 loc_40F0A1:      ; CODE XREF: sub_40911F+59EBj
 7 .text:0040F0A1     jmp     short $+2
 8 .text:0040F0A3
 9 .text:0040F0A3 loc_40F0A3:      ; CODE XREF: sub_40911F+53BAj
10 .text:0040F0A3     jmp     short $+2
11 .text:0040F0A5
12 .text:0040F0A5 loc_40F0A5:      ; CODE XREF: sub_40911F+47DAj
13 .text:0040F0A5     jmp     short $+2
14 .text:0040F0A7
15 .text:0040F0A7 loc_40F0A7:      ; CODE XREF: sub_40911F+3AB1j
16 .text:0040F0A7     jmp     short $+2
17 .text:0040F0A9
18 .text:0040F0A9 loc_40F0A9:      ; CODE XREF: sub_40911F+2D88j
19 .text:0040F0A9     jmp     short $+2
20 .text:0040F0AB
21 .text:0040F0AB loc_40F0AB:      ; CODE XREF: sub_40911F+21A8j
22 .text:0040F0AB     jmp     short $+2
23 .text:0040F0AD
24 .text:0040F0AD loc_40F0AD:      ; CODE XREF: sub_40911F+2141j
25 .text:0040F0AD     jmp     short $+2
26 .text:0040F0AF
27 .text:0040F0AF loc_40F0AF:      ; CODE XREF: sub_40911F+1DE9j
28 .text:0040F0AF     jmp     short $+2
29 .text:0040F0B1
30 .text:0040F0B1 loc_40F0B1:      ; CODE XREF: sub_40911F+1D82j
31 .text:0040F0B1     jmp     short $+2
32 .text:0040F0B3
33 .text:0040F0B3 loc_40F0B3:      ; CODE XREF: sub_40911F+1CB4j
34 .text:0040F0B3     jmp     short $+2
35 .text:0040F0B5
36 .text:0040F0B5 loc_40F0B5:      ; CODE XREF: sub_40911F+1C04j
37 .text:0040F0B5     jmp     short $+2
38 .text:0040F0B7
39 .text:0040F0B7 loc_40F0B7:      ; CODE XREF: sub_40911F+1B9Dj
Each of those lines bypasses the ‘set the good value’ line, and each of them is referred to earlier in this function. I immediately surmised that each of those locations were “bad” jumps—that is, there were thirteen or so checks that were happening, and that each one that failed would lead us back here. A thirteen character string seemed possible, where each letter was checked individually, so I started looking into it. Mak—awake once again—was not convinced.
The easy start
The final thing I did Friday night was look at the first check (the last one on that list), which is located at this line:
1 .text:0040ACBC jz loc_40F0B7
What causes that jump to fail? Long story short, it’s this:
1 .text:0040AC8E cmp r15d, [rbp-78h]
…where r15d is an unknown value, and [rbp-78h] is 0x18 (24). Let’s break and see what r15 is:
 1   ron@debian-x64 ~/cnot $ gdb -x ./gdbinit ./cnot
 2   Reading symbols from /home/ron/cnot/cnot...(no debugging symbols found)...done.
 3   Breakpoint 1 at 0x400710
 4
 5   Breakpoint 1, 0x00400710 in ?? ()
 6   (gdb) b *0x0040ac8e
 7   Breakpoint 2 at 0x40ac8e
 8   (gdb) cont
 9   Please enter your password: hello
10
11   Breakpoint 2, 0x0040ac8e in ?? ()
12   (gdb) print/d $r15
13   $1 = 5
14   (gdb) run
15
16   Breakpoint 1, 0x00400710 in ?? ()
17   (gdb) cont
18   Please enter your password: moo
19
20   Breakpoint 2, 0x0040ac8e in ?? ()
21   (gdb) print/d $r15
22   $2 = 3
23
When I enter ‘hello’, it’s 5, and when I enter ‘moo’, it’s 3. It compares that value to 0x18 (24), and fails if it’s anything else. We just found out the password length! And it was kind of easy!
By now it was about 5am on Friday night, and time for bed.
Not as dumb as I look
First thing Saturday morning—after three hours of sleep—I started and finished another flag—securereader. Don’t get me started on securereader. I fucked up badly, and it took wayyyyyy longer than it should have.
Anyway, by early afternoon, I was back to working on cnot. I was pretty sure those jumps were all the ‘bad’ jumps, so—in what I consider my #1 decision on this entire flag, at least tied with finding/replacing the ‘bad code’—I added a bunch of nop-outs to my gdbinit file:
 1 ron@debian-x64 ~/cnot $ cat ./gdbinit
 2 # Set up the environment
 3 set disassembly-flavor intel
 4 set confirm off
 5
 6 # Disable the anti-debugging
 7 set environment LD_PRELOAD ./overload.so
 8
 9 # Put a breakpoint at the 'start' function
10 break *0x00400710
11
12 # Run the program up to the breakpoint
13 run
14
15 # Verify length
16 set {int}0x040ACBC = 0x90909090
17 set {short}0x040ACC0 = 0x9090
18
19 set {int}0x040AD23 = 0x90909090
20 set {short}0x040AD27 = 0x9090
21
22 set {int}0x040ADD3 = 0x90909090
23 set {short}0x040ADD7 = 0x9090
24
25 set {int}0x040AEA1 = 0x90909090
26 set {short}0x040AEA5 = 0x9090
27
28 set {int}0x040AF08 = 0x90909090
29 set {short}0x040AF0C = 0x9090
30
31 set {int}0x040B260 = 0x90909090
32 set {short}0x040B264 = 0x9090
33
34 set {int}0x040B2C7 = 0x90909090
35 set {short}0x040B2CB = 0x9090
36
37 set {int}0x040BEA7 = 0x90909090
38 set {short}0x040BEAB = 0x9090
39
40 set {int}0x040CBD0 = 0x90909090
41 set {short}0x040CBD4 = 0x9090
42
43 set {int}0x040D8F9 = 0x90909090
44 set {short}0x040D8FD = 0x9090
45
46 set {int}0x040E4D9 = 0x90909090
47 set {short}0x040E4DD = 0x9090
48
49 set {int}0x040EB0A = 0x90909090
50 set {short}0x040EB0E = 0x9090
51
52 set {short}0x040F08C = 0x9090
53
54 cont
After like two hours of troubleshooting that code because I forgot that ‘long’ = 8 bytes and ‘int’ = 4 bytes (which Aemelianus had the pleasure to watch me fight with), eventually it worked:
1 $ gdb -x ./gdbinit ./cnot
2 Reading symbols from /home/ron/cnot/cnot...(no debugging symbols found)...done.
3 Breakpoint 1 at 0x400710
4
5 Breakpoint 1, 0x00400710 in ?? ()
6 Please enter your password: hello
7 Correct!
8
9 Program exited normally.
Excellent! I can easily test any of the checks without the others interfering!
From here on out, I did everything in a more or less random order, and each step took a long time. Ultimately, however, there were four main types of checks I found: character class (upper/lower/numeric), adjacent checks, shift checks (I’ll explain these later), and checksums. I solved the first three on Saturday, and the last—the hardest, the checksum—on Sunday. Let’s take each of them individually.
Character class
The character class checks happen right here:
 1 .text:0040AD00                 mov     rdi, [rbp-70h]
 2 .text:0040AD04                 mov     r15, rax        ; both = pointers to my string
 3 .text:0040AD07                 call    do_validation2  ; Validate a pattern (fully reversed)
 4 .text:0040AD0C                 mov     [rbp-68h], rax
 5 .text:0040AD10                 mov     rax, r15
 6 .text:0040AD13                 add     rsp, 0
 7 .text:0040AD17                 pop     r9
 8 .text:0040AD19                 pop     r8
 9 .text:0040AD1B                 mov     r15d, [rbp-68h]
10 .text:0040AD1F                 cmp     r15d, 0
11 .text:0040AD23                 jz      bad_place2
do_validation2() is about a million lines, and is actually a great place to get your feet wet with how the obfuscation works. By the end of it, I could move through pretty quickly. It calls three different functions, which are:
1 0x00402726 check_alphabetic(char c)
2 0x004028AC check_lowercase(char c)
3 0x0040297E check_numeric(char c)
I’m not going to dwell on how those work. Suffice to say, they’re about as simple as anything is in this binary. One line in the source, and only about 150 lines in the binary!
Essentially, throughout this function, you’ll see things like:
1 .text:00402AFD                 add     r11, rbx        ; add 0*8 to the offset
2 .text:00402B1E                 mov     rax, [rax]       ; rax = first character ("a")
3 .text:00402B40                 mov     rdi, rax
4 .text:00402B43                 call    check_alphabetic ; Returns '1' if it's upper or lower case
5 .text:00402B50                 cmp     eax, 0           ; '1' is good
6 .text:00402B53                 jz      bad
(note that I’m leaving out the extra ‘obfuscating’ lines)
This runs through every character, one by one, with similar checks. I did a ton of debugging to see what was going on, and was able to determine the ‘possible’ values of each character:
Character 1  :: Letter
Character 2  :: Letter
Character 3  :: Lowercase
Character 4  :: Lowercase
Character 5  :: Letter
Character 6  :: Symbol (not letter or number)
Character 7  :: Letter
Character 8  :: Symbol
Character 9  :: Number
Character 10 :: Lowercase
Character 11 :: Letter
Character 12 :: Letter
Character 13 :: Letter
Character 14 :: Uppercase
Character 15 :: Letter
Character 16 :: Letter
Character 17 :: Uppercase
Character 18 :: Letter
Character 19 :: Symbol
Character 20 :: Letter
Character 21 :: Letter (I originally had 'lowercase', that was wrong)
Character 22 :: Letter
Character 23 :: Uppercase
Character 24 :: Symbol
In addition to character classes, a couple properties were discovered here:
- The fourth character had to be one higher than the tenth character
- The twenty-first character was alphabetic, but if you subtract one it wasn't (therefore, it had to be a 'a' or 'A')
So now we have a lot of properties, and an actual letter! Progress! And we have one more check that’ll pass; two down, eleven to go!
Adjacent checks
After the character class checks, I was getting a little faster. There’s a ton of code, but eventually you learn how it indexes arrays, and that makes it much easier, since you can skip by about 95% of the code.
This section starts here:
 1 .text:0040AEE5                 mov     rdi, [rbp-70h]
 2 .text:0040AEE9                 mov     r15, rax
 3 .text:0040AEEC                 call    do_validation_5 ; Validates adjacent letters, and their relationships to each other
 4 .text:0040AEEC                                         ; rdi = pointer to string buffer
 5 .text:0040AEF1                 mov     [rbp-68h], rax  ; rax shouldn't be 0
 6 .text:0040AEF5                 mov     rax, r15
 7 .text:0040AEF8                 add     rsp, 0
 8 .text:0040AEFC                 pop     r9
 9 .text:0040AEFE                 pop     r8
10 .text:0040AF00                 mov     r15d, [rbp-68h]
11 .text:0040AF04                 cmp     r15d, 0
12 .text:0040AF08                 jz      bad_place5
Note that I’m not doing this in order; I don’t have to, since I disable the checks I’m not using!
Inside my stupidly named do_validation_5() (I didn’t know what it was going to do when I named it!), you’ll see the same pattern over and over and over; it loads a letter, then the next letter, and compares them with either jg (jump if greater) or jl (jump if less):
1 .text:00404FE2                 mov     r10, [r10]       ; first letter
2 .text:00405087                 mov     r11, [r11]       ; second letter
3 .text:0040508A                 cmp     r10d, r11d
4 .text:0040508D                 jg      short loc_405096 ; good jump
5 .text:0040508F                 mov     ebx, 0           ; bad
6 .text:00405094                 jmp     short loc_40509B
If you go through this, you’ll get the following relationships:
character[1]  > character[2]
character[2]  > character[3]
character[3]  < character[4]
character[4]  > character[5]
character[5]  > character[6]
character[6]  < character[7]
character[7]  > character[8]
character[8]  < character[9]
character[9]  < character[10]
character[10] < character[11]
character[11] > character[12]
character[12] < character[13]
character[13] > character[14]
character[14] < character[15]
character[15] < character[16]
character[16] > character[17]
character[17] < character[18]
character[18] > character[19]
character[19] < character[20]
character[20] > character[21]
character[21] < character[22]
character[22] > character[23]
character[23] > character[24]
When I got to this point, Mak started writing a Prolog and also a Python program so we could take these relationships and start deriving relationships. In the end, he started working on another flag, and I never actually used these relationships to solve anything…
On the plus side, after the first few, it was fast going! I did the first seven or eight carefully and with a debugger, and all the rest I just blew through in about a half hour!
Shift checks
So, I purposely waited to work on these ones, because they called long functions, which called other long functions, which did crazy shifty stuff. After I actually started reversing, I realized that it was actually pretty easy—most of them did the same thing! Everything in this binary looks long and complicated, though.
Let’s start with one of the innermost functions. Removing all the crap, it does this:
 1 .text:00400E75 shift10         proc near
 2 .text:00400EAA                 mov     rax, rdi        ; rax = arg
 3 .text:00400EC8                 mov     r10, rax        ; r10 = arg
 4 .text:00400ECB                 mov     r11d, 0Ah       ; r11 = 10
 5 .text:00400ED2                 mov     r15d, r10d      ; r15 = arg
 6 .text:00400ED5                 mov     ecx, r11d       ; ecx = 10
 7 .text:00400ED8                 sar     r15d, cl        ; r15 = arg >> 10
 8 .text:00400EDB                 mov     ebx, r15d       ; ebx = rdi >> 10
 9 .text:00400EDF                 mov     r10d, 1Fh       ; r10 = 0x1f
10 .text:00400F00                 and     ebx, r10d       ; ebx = (arg >> 10) & 0x1f
11 .text:00400F03                 mov     rax, rbx
12 .text:00400F1B                 pop     rdi
13 .text:00400F1C                 jmp     rdi
Which is basically:
1 return (arg >> 10) & 0x1F
Easy! There are actually a bunch of functions that do almost the same thing:
1 def shift0(c)  return (c >> 0) & 0x1F; end
2 # Oddly, there's no shift5()
3 def shift10(c) return (c >> 0) & 0x1F; end
4 def shift15(c) return (c >> 0) & 0x1F; end
5 def shift20(c) return (c >> 0) & 0x1F; end
6 def shift25(c) return (c >> 0) & 0x1F; end
7 def shift30(c) return (c >> 0) & 0x03; end
Then those functions are called from two others (actually, three, but the third is never used in the code we care about):
1 .text:00401E96 shifter()
2 .text:00402413 shifter2()
I’m not going to waste your time by reversing them. They’re kinda long, but fairly simple. Here is what they end up as:
1 def shifter(c, i = 0)
2   return i | (1 << shift10(c)) | (1 << shift5(c)) | (1 << shift0(c))
3 end
4
5 def shifter2(c, i = 0)
6   return i | (1 << shift25(c)) | (1 << shift20(c)) | (1 << shift10(c)) | (1 << shift0(c))
7 end
Basically, take various sequences of five bytes within the string, and set those bits in another value!
Now, how are these used? The first use is easy, and is actually the second-simplest check (after the length check). It looks like this (once again, I’ve removed obfuscating lines):
1 .text:0040B04B      mov     rsi, [rbp-80h]  ; rsi = last character
2 .text:0040B04F      mov     r15, rax
3 .text:0040B052      call    shifter
4 .text:0040B057      mov     [rbp-70h], rax
5 .text:0040B066      mov     qword ptr [rbp-78h], 0
6 .text:0040B06E      mov     dword ptr [rbp-78h], 80000003h
7 .text:0040B075      mov     r15d, [rbp-70h]
8 .text:0040B079      cmp     r15d, [rbp-78h]
9 .text:0040B07D      jz      short loc_40B093 ; Good jump
So the last line of the string is the symbol that, when put through shifter(), produces 0x80000003? That’s easy! Here’s a quick Ruby program (I actually did it in a much more complicated way originally, by literally reversing the algorithm, but that was dumb):
1 0x20.upto(0x7F) do |i|
2 if(shifter(i) == 0x80000003)
3     puts("Character: #{i.chr}")
4 end
5 end
Which prints out:
1 ron@debian-x86 ~$ ruby ./do_shift.rb
2 Character: ?
The last character is a question mark! Awesome!
After that, there are a bunch of checks (all remaining checks but two, in fact!) that all sort of look the same (and are implemented inline, not in functions). One of them you can find starting at 0x0040BEAD, and the logic is something like this:
 1 c = second_character;
 2 if(shifter(c, c) == shifter2(c, c))
 3 {
 4   if(shifter(c - 0x20, c - 0x20) != shifter2(c - 0x20, c - 0x20))
 5   {
 6     if(c < 'i' && c > 'd')
 7     {
 8       acceptable_second_character(c);
 9     }
10   }
11 }
Implementing it in Ruby (this code will only work in 1.9 because of String.ord()) will look something like this:
1 ?A.upto(?Z) do |i| 2 i = i.ord 3 (set << i) if(shifter(i, i) == shifter2(i, i)) 4 end 5 ?a.ord.upto(?z.ord) do |i| 6 i = i.ord 7 (set << i) if(shifter(i, i) == shifter2(i, i)) 8 end 9 10 set.each do |i| 11 if(shifter(i - 0x20, i - 0x20) != shifter2(i - 0x20, i - 0x20)) 12 if(i > ?d.ord && i < ?i.ord) 13 puts(i.chr) 14 end 15 end 16 end
And running it:
1 $ ruby do_shift.rb
2 h
Tells us that the only possibility is ‘h’! We just solved the second letter!
There are a ton of checks like this, and I’m not going to go over the rest of them. The only other noteworthy “shift” check is the function defined here:
1 .text:00406F32 check_duplicates
Which goes through a bunch of fields, and requires them to be equal to one another (eg, the sixth, eighth, and nineteenth characters are the same; the fourteenth and seventeenth letter are the same; etc).
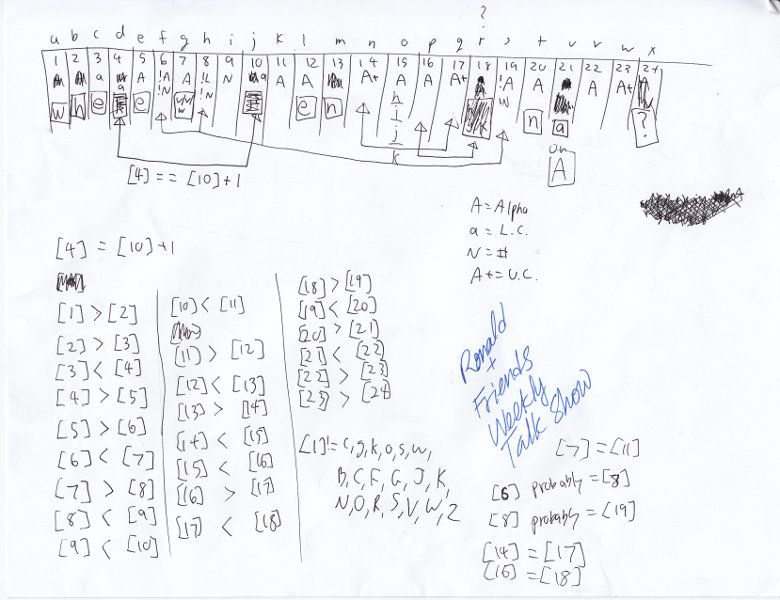
When all’s said and done, at the end of the ‘shift’ stuff, and including the character class checks, we have the following properties:
  Character 1  :: 'w'
  Character 2  :: 'h'
  Character 3  :: 'e'
  Character 4  :: Lowercase letter = the 10th character + 1
  Character 5  :: 'e'
  Character 6  :: Symbol, same as 8th and 19th characters
  Character 7  :: 'u', 'v', or 'w'
  Character 8  :: Symbol, same as 6th and 19th characters
  Character 9  :: Number
  Character 10 :: Lowercase
  Character 11 :: Letter
  Character 12 :: 'e'
  Character 13 :: 'n'
  Character 14 :: Uppercase, same as 17th
  Character 15 :: 'h', 'i', 'j', or 'k'
  Character 16 :: Letter, same as 18th
  Character 17 :: Uppercase, same as 14th
  Character 18 :: Letter, same as 16th
  Character 19 :: Symbol, same as 6th and 8th
  Character 20 :: 'n'
  Character 21 :: 'a' or 'A'
  Character 22 :: Letter
  Character 23 :: Uppercase
  Character 24 :: '?'
To put it another way:
whe_e._.#__en_____.na__?
I reached this point… maybe 5am on Saturday night? The next hour me and Rylaan and others spent trying to make guesses. We were reasonably sure that the fourth letter was ‘r’, making the first word ‘where’. That would make the tenth character a ‘q’ and the eleventh a ‘u’. That worked out pretty well. And putting a ‘u’ in the seventh character (since it’s much more likely than ‘v’ or ‘w’) and making the symbols into spaces made sense. That gave us:
where u #quen_____ na__?
We also surmised that the last word was ‘namE’ or ‘nAME’ or something, but that turned out to be wrong so I won’t show that part off. :)
Here is what I had scribbled down at this point.
Before bed, I wrote a quick Ruby script that would bruteforce guess all unknown characters, hoping to guess it by morning. That was also a failure. It barely got anywhere in the three hours I slept.
Checksums
I went to sleep on the hackerspace couch at 6am Saturday night, and woke up at 9am with the idea: “quantum”! “where u quantum name” or something. So I jumped up, ran to the computer, and realized that that made no sense. Crap! But I was already up, may as well work on it more. I spent the next little while updating Mak on my progress and thinking through the next step.
I spent a few hours working on these four checksum values:
1 .text:0040AD41                 mov     dword ptr [rbp-78h], 0FAF7F5FFh ; checksum1
2 .text:0040AD81                 mov     dword ptr [rbp-90h], 0A40121Fh  ; checksum2
3 .text:0040AE00                 mov     dword ptr [rbp-78h], 0FF77F7F6h ; checksum3
4 .text:0040AE4F                 mov     dword ptr [rbp-90h], 0FD9E7F5Fh ; checksum4
I spent hours trying to reverse how those were calculated before finally giving up. I was running out of ideas. I had eleven of the thirteen checks passing, with only the four checksums (in two checks) to go! Gah!
I noticed an interesting property in the checksums, though: the values I was generating were actually quite close to the real ones, compared to what they’d originally been! If I changed a known “good” character to a bad one, it got worse. All I had to do was figure out a way to either generate the checksums myself or pull them from memory! At this point in the game, generating them myself was pretty much outta the question, so I had to find a way to extract them, and quickly!
I won’t bore you with the failed attempts, only the successful attempt. It’s a Ruby program, and it looks something like this (check out the sweet syntax highlighting, I even highlighted the gdbinit file properly; that wasn’t easy!):
  1 def count_bits(i)
  2   bits = 0
  3
  4   while(i != 0) do
  5     if((i & 1) == 1)
  6       bits += 1
  7     end
  8
  9     i >>= 1
 10   end
 11
 12   return bits
 13 end
 14
 15 def go(str)
 16   puts(" String: '#{str}'")
 17
 18   # Write the current test string to a file called 'stdin'
 19   File.open("./stdin", "w") do |f|
 20     f.write(str)
 21   end
 22
 23   File.open("./gdb", "w") do |f|
 24   f.write <<EOF
 25 # Set up the environment
 26 set disassembly-flavor intel
 27 set confirm off
 28
 29 # Disable the anti-debugging
 30 set environment LD_PRELOAD ./overload.so
 31
 32 # Read from the "stdin" file, which is where we're writing the data
 33 set args < ./stdin
 34
 35 # Break at the first check (the length)
 36 b *0x040AC83
 37 run
 38
 39 # Make all 4 checksums run by forcing jumps to happen
 40 set {char}0x40AD50 = 0xeb
 41 set {char}0x40AE0F  = 0xeb
 42
 43 # Checksum 1 and 2
 44 set {int}0x040ADD3 = 0x90909090
 45 set {short}0x040ADD7 = 0x9090
 46
 47 # Checksum 3 and 4
 48 set {int}0x040AEA1 = 0x90909090
 49 set {short}0x040AEA5 = 0x9090
 50
 51 # TODO: Test once mak finishes the python tool
 52 # Check adjacent characters
 53 set {int}0x040AF08 = 0x90909090
 54 set {short}0x040AF0C = 0x9090
 55
 56 # Checksum1
 57 b *0x000000000040AD4C
 58
 59 # Checksum2
 60 b *0x000000000040AD92
 61
 62 # Checksum3
 63 b *0x000000000040AE0F
 64
 65 # Checksum4
 66 b *0x000000000040AE60
 67
 68 cont
 69
 70 print/x $r15
 71 cont
 72
 73 print/x $r15
 74 cont
 75
 76 print/x $r15
 77 cont
 78
 79 print/x $r15
 80 cont
 81
 82 # We continue before quitting so we can make sure 'Success!' is printed
 83 quit
 84
 85 EOF
 86   end
 87
 88   checksums = []
 89
 90   # Our list of known-good checksums
 91   good_checksums = [0xFAF7F5FF, 0xA40121F, 0xFF77F7F6, 0xFD9E7F5F]
 92
 93   # Run gdb with our new config file
 94   IO.popen("gdb -x ./gdb ./cnot") {|p|
 95     loop do
 96       line = p.gets
 97       if(line.nil?)
 98         break
 99       end
100       if(line =~ / = /)
101         checksums << line.gsub(/.* = /, '').chomp.to_i(16)
102       end
103
104       if(line =~ /Wrong/)
105         puts(line)
106         puts("ERROR!")
107         exit
108       end
109     end
110   }
111
112   puts(" Expected: %08x %08x %08x %08x" % [good_checksums[0], good_checksums[1], good_checksums[2], good_checksums[3]])
113   puts(" Received: %08x %08x %08x %08x" % [checksums[0],      checksums[1],      checksums[2],      checksums[3]])
114
115   # Count the different bits and print the difference
116   diff = count_bits(good_checksums[0] ^ checksums[0]) + count_bits(good_checksums[2] ^ checksums[2]) + count_bits(good_checksums[1] ^ checksums[1]) + count_bits(good_checksums[3] ^ checksums[3])
117   puts(" Difference: %d" % diff)
118   puts()
119
120   # Return the difference so we can save the best one
121   return diff
122 end
123
124 diffs = {}
125
126 ?0.upto(?9) do |i|
127   i = i.chr
128
129   str = "where u #{i}quenTisTs naME?"
130     diff = go(str)
131
132     diffs[diff] = diffs[diff] || []
133     diffs[diff] << "#{i} :: #{str}"
134   end
135 end
136
137 # Print the best option(s)
138 i = 0
139 loop do
140   if(!diffs[i].nil?)
141     puts("== #{i} ==\n#{diffs[i].join("\n")}")
142     exit
143   end
144
145   i += 1
146 end
And in that particular configuration, the program attempts every possible number for the start of the third word:
 1 $ ruby ./cs.rb
 2  String: 'where u 0quenTisTs naME?'
 3  Expected: faf7f5ff 0a40121f ff77f7f6 fd9e7f5f
 4  Received: fafff5ff 1240021f f377f5e7 fd92ff7f
 5  Difference: 13
 6
 7  String: 'where u 1quenTisTs naME?'
 8  Expected: faf7f5ff 0a40121f ff77f7f6 fd9e7f5f
 9  Received: fafff5ff 1240021f f377fde6 fd927fff
10  Difference: 13
11
12  String: 'where u 2quenTisTs naME?'
13  Expected: faf7f5ff 0a40121f ff77f7f6 fd9e7f5f
14  Received: fafff5ff 1240021f f377fde6 fd927f7f
15  Difference: 12
16
17  String: 'where u 3quenTisTs naME?'
18  Expected: faf7f5ff 0a40121f ff77f7f6 fd9e7f5f
19  Received: fafff5ff 1240021f f777f5f6 fd967f7f
20  Difference: 8
21
22  String: 'where u 4quenTisTs naME?'
23  Expected: faf7f5ff 0a40121f ff77f7f6 fd9e7f5f
24  Received: fafff5ff 1240021f f377f5ee ffd27f7f
25  Difference: 14
26
27  String: 'where u 5quenTisTs naME?'
28  Expected: faf7f5ff 0a40121f ff77f7f6 fd9e7f5f
29  Received: fbfff5ff 1240021f f37ff5e6 fd927f7f
30  Difference: 13
31
32  String: 'where u 6quenTisTs naME?'
33  Expected: faf7f5ff 0a40121f ff77f7f6 fd9e7f5f
34  Received: fafff5ff 1240021f f377fde6 fd927f7f
35  Difference: 12
36
37  String: 'where u 7quenTisTs naME?'
38  Expected: faf7f5ff 0a40121f ff77f7f6 fd9e7f5f
39  Received: fefff5ff 1240021f f377f5e6 fd927f7f
40  Difference: 12
41
42  String: 'where u 8quenTisTs naME?'
43  Expected: faf7f5ff 0a40121f ff77f7f6 fd9e7f5f
44  Received: fafff5ff 1240021f f3f7f5e6 fdd27f7f
45  Difference: 13
46
47  String: 'where u 9quenTisTs naME?'
48  Expected: faf7f5ff 0a40121f ff77f7f6 fd9e7f5f
49  Received: fafff5ff 1240021f f377f5e6 fd927f7f
50  Difference: 11
51
52 == 8 ==
53 3 :: where u 3quenTisTs naME?
As you can see, the best result we got from this was eight bits different, and the number ‘3’ (which tuned out to be correct)!
We did this over and over for different letters, occasionally repeating letters if we wound up getting bad results, getting closer. I considered writing an A* search or something, I bet we could have optimized this pretty good, but that turned out to not be necessary. Eventually, I was reasonably sure everything was right except for the last two letters (in ‘naME’), so I decided to try every possible pairing:
 1 ?a.upto(?z) do |i|
 2   i = i.chr
 3   ?A.upto(?Z) do |j|
 4     j = j.chr
 5     str = "where u 3quenTisTs na#{i}#{j}?"
 6     diff = go(str)
 7
 8     diffs[diff] = diffs[diff] || []
 9     diffs[diff] << "#{i} :: #{str}"
10   end
11 end
And eventually, it printed out:
 1 $ ruby cs.rb | tail
 2 Received: 7ef7f7ff 0240221f f7f7f5f6 fd96ffff
 3 Difference: 13
 4
 5 String: 'where u 3quenTisTs nazZ?'
 6 Expected: faf7f5ff 0a40121f ff77f7f6 fd9e7f5f
 7 Received: 7ef7f5ff 0240421f f777f5fe fd977f7f
 8 Difference: 11
 9
10 == 0 ==
11 o :: where u 3quenTisTs naoW?
The answer! I punched it into the site, and it worked. omg!!! #bestfeelingever
Conclusion
I realize this was an extremely long writeup, for an extremely elaborate level. It took a long time to solve, and I was exceptionally proud. Did I mention that, at 450 points, it was the most valuable flag in the entire competition?
Just to go over what I had to overcome:
- Anti-debugging
- Anti-reversing (obfuscation)
- More code obfuscation
- A series of "letter n is between x and y" type solutions, instead of actual "this letter is z" solutions
- Crazy checksums that, it turns out, used Fibonacci sequences (I never did reverse them)
And that’s cnot in a nutshell. Thanks for reading!
Comments
Join the conversation on this Mastodon post (replies will appear below)!
Loading comments...